Showing posts with label Dylusions ink. Show all posts

Friday, October 30, 2015

Halloween Mixed Media Art Journal Page - Challenge Entry

Hello again.  I cannot believe that it is already All Hollows Eve!  I wanted to share a Halloween art journal page that I finished this morning.  I tried to get it done last night, but I was just too tired after work. I will be entering this art journal page in a few blog challenges which will be listed down below.

I created this art journal page with the following materials: Dylusions Vibrant Turquoise Ink Spray, Dylusions Fresh Lime Ink Spray, Black Soot Distress Paint, Sakura Souffle Markers, Aleene's Tacky Glue, black Sharpie pen, handmade felt star stamp, Cool Grey Kaiserfusion alcohol marker, and scrapbook paper.


I was inspired to create this page when I found an old Martha Stewart Living magazine with this image on the cover.  I scanned the cover and printed out a black and white copy of this image on a heavy weight card stock.  I colored in the owl and pumpkin with turquoise, blue, lime green, and orange Sakura Souffle pens. I added definition to the pumpkin and owl with a black Sharpie pen. I then used Fresh Lime and Vibrant Turquoise Dylusions spray ink to cover the background. I wanted to add distressed looking stars to the background so I cut a star out of felt to use as a stamp.  I used Black Soot Distress Paint to stamp the stars on the background. I then added smaller orange stars to the background with a souffle pen and outlined the black stars. I glued the owl and pumpkin image to journal page with tacky glue. I thought that the page needed a little more oomph so I cut out a witch's hat from scrap paper and added turquoise polka dots. When the hat was dry I glued it down to the journal page.  I outlined the owl image with a grey Kaiserfusion alcohol marker to create dimension. I ended up drawing spider webs on the corners of the page with a sharpie pen to create a nice border around the journal page.  The last thing I did was distress the outer edges of the paper with black distress paint.

I wasn't sure how this art journal page was going to turn out with a blue owl, but I absolutely love it!  I like it so much that I am entering this art journal page in a few challenge blogs.

The Mixed Media Monthly Challenge - Halloween Word Search
I used the words Black, Owl, and Witch from this word search.

Dream In Darkness Challenge
Simon Says Stamp Monday Challenge - Throwback
The throwback challenge I chose was from August 2015 - Trio of Colors

Thank you so much for stopping by the blog today.  Be sure to enjoy this All Hollows Eve and do not conjure anything up you will regret later! Have a great Friday. ❤ Tia - Copper Blossom Paperie ❤

Sunday, October 25, 2015

Halloween Mixed Media Box - Challenge Entry

Hello everyone!  I hope all of you had a great weekend.  I finally finished my mixed media Halloween project and thought I would share it with all of you tonight!  I have been working on this project for a few weeks now and am finally finished... just in time for Halloween this week.  I love how this Halloween box turned out and hope you like it too!


I didn't have a lot of money for this project, so I went to Dollar Tree and found a paper photo box to alter. I was not sure how I was going to cover the box, but knew I wanted to use a skull from a broken gravestone decoration I found in my basement.  I also had a partial autumn leaf swag remaining from the wreath I made last month. Other supplies I used include DecoArt acrylic gel medium, DecoArt orange acrylic paint, black soot Distress Paint, Dylusions ink sprays, white Academy Art acrylic paint, DecoArt Media modeling paste, masking tape, various scrapbook papers, Aleene's Tacky Glue, hot glue, fabric netting, fabric flowers, ribbon, spider stickers, and recycled gems.  I literally only spent $1.00 on the entire project!

The first thing I did to create this spooky box was line the inside of the box with striped scrapbook paper. I added orange and purple ink to the stripes to give the interior a grunge appearance. I then used black soot distress paint to distress the edges and corners of the box. Since I will be using this box to hold extra paints and art supplies, I coated the inside with two coats of acrylic gel medium.


Next I covered the exterior of the box with paper.  I decided to use 4 different papers (2 of which were glitter papers) and cut them in strips of various sizes. I then glued the paper stripes around the full exterior of the box. When the glue was dry I put two coats of acrylic gel medium over the papers to prevent the glitter paper from shedding glitter. I absolutely love glitter paper, but really hate the mess! I added a painted masking tape trim around the top of the box. I also distressed the outside edges of the box with black distress paint.  Lastly, I added a grey tag in the label holder that says "31".


After finishing the box, I decided to work on the lid. The first thing I did was line the inside of the lid with black paper. I distressed the inside of the lid with black distress paint to match the inside of the box. I then covered the exterior of the lid with a grungy grey paper.  I sprayed Dylusions ink spray on the cover to add color. I then used black distress paint to distress the lid.  I absolutely loved how the black distress paint captured the wrinkles of the glued down paper. Once the glue and ink was dry I coated the entire lid with acrylic gel medium. Lastly, I added painted masking tape trim around the edge of the lid.


I cut out this skull from a damaged gravestone decoration that I had stored in the basement.  The skull was a bit damaged, so I used modeling paste to fill in some of the damaged areas and smooth out parts of the skull. The paint was pealed off so I used black distress paint and white acrylic paint to repaint the skull. I had a bunch of recycled gems I wanted to add to the piece, and found two gems that fit perfectly in the eye sockets.  I drew cracks on the forehead and added a spider sticker to make this skull extra creepy.


To finish this box, I added a bunch of elements to the cover. I placed a "Wicked 31" note first on the cover along with a few leaves.  After gluing those elements down, I decided to add black fabric mesh to the box cover. I glued down the skull, leaves, and purple ribbon next.  The cover looked good at this point, but I wanted to add some fabric flowers and a few extra sticker spiders. The leaves and fabric flowers were painted with distress paint, acrylic paint, and alcohol markers to match the rest of the box.  In the end I decided to add a couple black fabric covered gems around the skull that looked like arrowheads.


 This is the finished box lid. I absolutely love the end result. This box is one of my favorite mixed media pieces to date!


Here are a few more pictures of the finished Halloween box.


This Halloween project is being entered in a few contests and challenges this week.  Here are the links to the challenge blogs!

Simon Says Stamp Monster Mash Challenge
DecoArt Mixed Media Haunts Challenge
That Craft Place Challenge - Anything Goes
 Anything But Cute Challenge - 31 Days of Halloween
Our Creative Corner - Halloween Horror Challenge
Frilly & Funky - Something Wicked
Emeral Creek Dares - Trick or Treat Dare

Thank you so much for stopping by and checking out my mixed media Halloween box.  It is amazing what you can create with $1.00 and a bunch of stuff laying around your house.  Never let your lack of time or finances hinder your creativity. Nothing is impossible.  If you enjoyed this post, please feel free to follow this blog or subscribe via e-mail.  I do appreciate all comments and social media shares.  Again, thank you!  Have a fantastic week everyone! ❤ Tia - Copper Blossom Paperie ❤

Wednesday, October 14, 2015

Watercolor & Ink Altered Barn Owl Print - Simon Says Stamp Blog Challenge

Hello Everyone!  I normally do not blog twice in a single day, but I want to post a special watercolor print I created for the Simon Says Stamp Blog Challenge.  This print was created using a really bad artist proof from my signed and numbered "Barn Owl" edition.  The original Barn owl prints were created using a hand carved linoleum block and an oil based ink on Reeves BFK cold pressed paper. During the printing process, I ended up with several artist's proofs (prints with mistakes, different colored inks, smudges, etc.).  As an artist, I never throw away any art or paper.  You never know when those "junk" papers will come in handy!


I think that the finished print above turned out BEAUTIFUL!  I wasn't sure how it was going to turn out because I was using water based paint and ink over an oil ink print, but I love the effects and colors.


This print is the original black and white "Barn Owl" print.  Like the print I used to create the watercolor print above, this too is an artist's proof due to imperfect printing (uneven ink, unintentional white spots, and smudging within the feathers).  The artist proof I used for the watercolor print had lots of background areas that were poorly inked resulting in a lighter, splotchy background.

The materials used include:
 - artist's proof linocut print
 - tracing paper (to create a mask over the owl)
 -  black permanent marker
 - Dylusions ink spray in colors White Linen, Pure Sunshine, London Blue, After Midnight, Cherry Pie, and Cut Grass
 - Distress paint in colors Black Soot, Mowed Lawn, Chipped Sapphire, and Salty Ocean
 - Distress Ink in colors Peacock Feathers,Picked Raspberry, and Faded Jeans
 - Archival Black Ink Pad
 - Water in a spray bottle
 - Masking tape
 - Stamp with script
 - Fineline masking fluid
 - Workable fixative
 - White Gelli Roll pen

The first thing I did was create a mask for the main owl. I also used a little masking fluid and masking tape to preserve key white areas without over doing it.  I did not perfectly mask the owl because I wanted the colors to bleed and drip into the image a bit. I then started to layer areas of distress paint on the print and sprayed the print with water to get the colors to move. When that layer was dry, I started to spray Dylusions ink spray over certain areas of the image. I blotted some spots right away, and other spots I sprayed with water to create drips.  My After Midnight ink sprayer was clogged a bit, so I accidentally created large splatters on the image. I ended up using other colors to purposely create splatters similar to the After midnight spots. I let the image dry and removed the masks. I decided to use a workable fixative at this point so I could add more layers of color without disturbing the layers of paint and ink underneath. I ended up blending distress ink into the background and into the owl's feathers to get rid of a bit of the stark white. I also added a bit of Chipped Sapphire Distress Paint to the shadow areas of the feathers to bring more color into the owl image. I ended up layering colors until I was happy with the print.  I then stamped some script on the image using black Archival ink. The last thing I did was use a white Gelli Roll Pen to add back a few of the white details in the feathers. Viola, the altered print is complete!

In the end, I loved how the different mediums interacted with each other.  The distress paint worked well on the oil based ink, but the Dylusions Ink spray and Distress Ink seemed to avoid those inked areas and preferred to seep into the Reeves paper. I absolutely love how this altered print turned out and can't wait to try this technique again!


This image is being entered into the watercolor challenge at  Simon Says Stamp Monday Challenge.

Thank you so much for stopping by the blog.  I am apologizing in advance if I do not post to the blog for a couple days. I have been physically exhausted all week due to returning to work after a six month medical leave. Despite my surgery being successful, my ankle continues to be extremely painful and swollen.  Anyway, I will try to post to the blog and create art if my body allows it.  I hope all of you have a fantastic Thursday tomorrow. Take care. ❤ Tia - Copper Blossom Paperie ❤

Sunday, October 11, 2015

Weekend Art Journal Page

Hello everyone.  I hope you all had a fabulous weekend.  I got to spend some time with my family this warm autumn weekend. I also got to enjoy the Green Bay Packer football game this afternoon and made a few cream pies. Finally back home and able to post to the blog.

Tonight I just wanted to share a mixed media art journal page that I created this weekend. I created this page using dylusions ink sprays, acrylic gel medium, scrap paper, gel pens, a face cut out from a magazine ad, and a black permanent marker.  This page was inspired by a magazine makeup ad. I was thinking that all women should be proud of who they are and show their true colors.  We are all beautiful people and should not change who we are to fit into society's idea of beauty.  I love how this art journal page turned out, but wish the magazine paper wouldn't have wrinkled so much when adhering it into my dylusions journal.


Thank you so much for visiting the blog tonight.  As always, feel free to share this post on social media or follow this blog.  Have a great night! ❤ Tia - Copper Blossom Paperie ❤ 

Friday, August 28, 2015

Dylusions Ink... Going Beyond Backgrounds

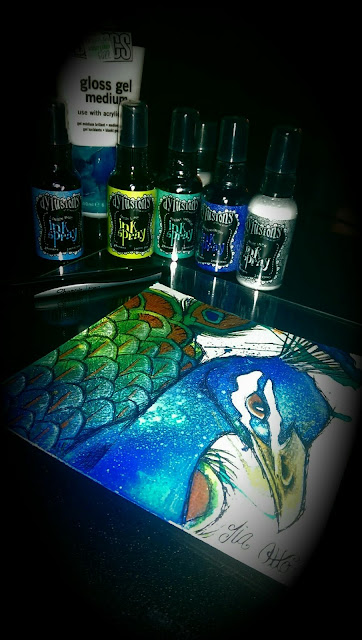
As I return home from Rochester, Minnesota I thought I would share a Dylusions art project.  This project was completed this last spring when I was experimenting with these inks.
I realize that these inks are generally used for backgrounds and stencils, but they can also be used like watercolor paints!  For this particular image, I had drawn a peacock with a pencil on white cardstock. I used masking tape to mask off the white areas.  You could also use masking fluid. I sprayed London blue, turquoise, lime, and crushed grape dylusions on the cardstock. It is important to let the dylusions dry completely before removing the masking tape. Once dry, remove the masking material.   I loved that a little bit of ink seeped through the masking tape since it really created a sloppy watercolor look.  I even spattered lemon zest to create an even sloppier watercolor drawing.  Feel free to spray water or use a waterbrush to allow the inks to bleed.
When I was satisfied with the layers of ink, I added outlines with permanent marker to define the peacock image and really make it stand out.  I also used color pencil to add highlights and shadows.  This can also be accomplished with watercolor, distress markers, alcohol markers, or watercolor pencils.  That is all there is to creating this project. 


I hope you enjoyed this post.  Please feel free to comment and share this post on social media.  I hope all of you have a blessed weekend! ❤ Tia - Copper Blossom Paper Gallery ❤  

Sunday, August 23, 2015

Sharing Another Art Journal Page

Hello Everyone.  I hope all of you had a great weekend and are able to relax a little before the new work week. Besides watching the Green Bay Packer's football game today, I have been working on a couple new oracle cards that I hope to share with you in a couple days. Its hard to believe that it is already football season! The cooler weather and rain here in Wisconsin has definitely made me think of fall.  Autumn is my favorite season so I am definitely looking forward to creating and sharing all sorts of fall crafts with you. I am also going to start creating a Halloween digital scrapbook kit next week.

Today I thought I would share another art journal page with you.  I completed this page a while ago but absolutely love it! I created the page using dylusions ink sprays, floral stencils, distress paint, a black permanent marker, and a white gel pen.  I started by using grey distress paint to stencil a general floral image and crackle texture on the page. Next, I sprayed Pure Sunshine and Post Box Red dylusions inks over the entire page.  After letting the page air dry, I stenciled dandelions on the page using a metallic silver distress paint. When the distress paint was dry, I used a black permanent marker to outline the dandelions, add a border, and write the word art.  Lastly, I used a white gel pen to outline the letters and add dimension to the dandelions.


As always, I hope you enjoyed reading this blog post.  If you enjoy my blog, please subscribe via e-mail or follow my blog on google +.  Please feel free to share your thoughts or suggestions in the comments section below. You can stop by the website or my facebook page if you are interested in learning more about Copper Blossom.  I also have an Etsy shop if you are interested in purchasing one of my digital kits. All of the website links are located to the right of this post for your convenience. Thanks for stopping by and enjoy the rest of your Sunday.  ❤ Tia - Copper Blossom Paper Gallery

Sunday, August 16, 2015

Another Day, Another Art Journal Page

Welcome back to my blog.  I hope everyone is having a super fun weekend.  I got to spend some time yesterday visiting family and enjoying the beautiful weather here in Wisconsin.  I don't get out of the house much since I am still in a cast and getting around via knee scooter, but I always enjoy getting out when I can. Today is totally dedicated to relaxation and art. I am currently working on a couple more oracle cards which I hope to share tomorrow.  Today I thought I would share another art journal page with you.

I love creating art in an art journal.  I am a perfectionist by nature, but what I create in a journal does not have to be perfect.  Its actually kind of an intuitive practice.  You are making choices and layering media as you go rather than sticking to a set plan.  Sometimes I do start with a plan, but other times I just start working with what I have until an image or idea comes to me.  I usually start by picking out a few paint or ink colors, and go from there.


In this image, I used dylusions spray inks, distress paint, a black permanent marker, adhesive, spray fixative, and gel pens. First I adhered a shimmery brown paper to the page and trimmed the access off.  Once dry, I sprayed turquoise, crushed grape, and London blue dylusions ink in random spots and let air dry.  I do not have any heat tools, so all of my projects are forced to air dry.  When dry, I used spray fixative to set the water based ink so that I could continue to work on the image without ruining the background. Next I daubed spots of white distress paint on the image. It was at this point I decided to draw an inverted sunflower and added the quote. I also created a border right away to frame the image.  I had no idea how I wanted to color in the sunflower, so I created zentangles and different designs within each petal. All of the petals were then colored in using random gel pens and a black marker. Lastly, I outlined everything with a black marker and white gel pen.

I really love how random and intuitive the art in my journal is.  It is somewhat like a sketchbook where I can try new ideas and techniques. I get to discover what mediums work together, and which ones don't.  I encourage everyone to experiment in their journals, and used the materials you have on hand.  In the end, if you do not like what you have created, paint over it and start a new project. 

Thank you for visiting my blog.  Please comment below and share this post on your blog, google + or social media page if you find this helpful or inspiring.  Have a happy Sunday everyone! ❤ Tia - Copper Blossom Paper Gallery